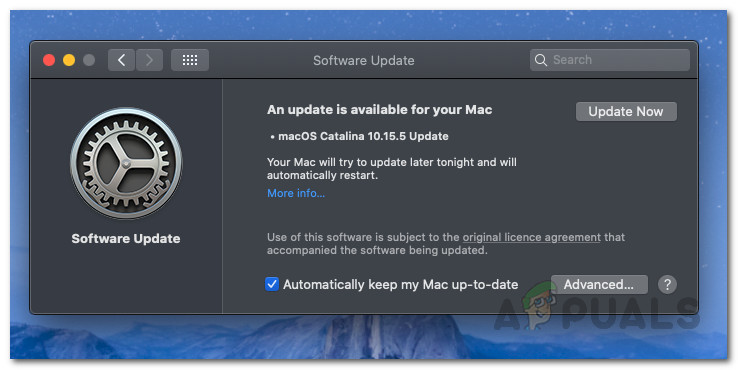
Nonetheless, you do not have to worry as we will be covering it in this article and you just have to follow through. As it turns out, in some cases, upon trying to update Mac devices, the device reboots without actually installing the update on the Mac. This can be very annoying as users still find the Update Now button under Software Update even after trying numerous to download and install it. Since this issue is very common and known, the possible causes are now knowledge to the users as well. We will be mentioning them down below so that you can know what was actually causing the behavior. With that said, let us get started. With the being said, we shall move on to the different methods that you can use to fix the issue and as a result, install the required updates successfully. Let us get into it.
Method 1: Free up Space
As obvious at this point, the first thing that you should when you face such a problem is to free up some space on your Mac for the update. As it turns out, in order for an update to be installed, you have to have enough storage for the components of the update. When you are almost full on your space, the update won’t be able to proceed and thus you see the Update Now option on every reboot even after trying to install it. Therefore, to fix this, you will have to free up some space. It is often recommended that you have at least a free space of around 30 gigs when you are trying to install an update. Therefore, go ahead and free up some space if you don’t have any. You can try deleting any old files that are no longer needed or alternatively, you can back them up to an external drive. The goal is to free up some space for the update. Once you have enough space, try installing the update again to see if it fixes the issue.
Method 2: Boot Into Safe Mode
Another reason why your update is not able to install is the third-party software that you have installed on your device. This is something pretty common and there are tons of situations where certain apps you have can interrupt the update. Some users were facing the issue because of the Cisco AnyConnect app. However, in your case, it might something and it is really hard to identify the exact app. Therefore, a safer option is to just update your Mac while in Safe Mode. What actually Safe Mode does is it starts your device with the minimal and required services only. This is useful because anything else that could possibly interfere with the update won’t get started and you can update easily. Follow the instructions down below to boot into Safe Mode:
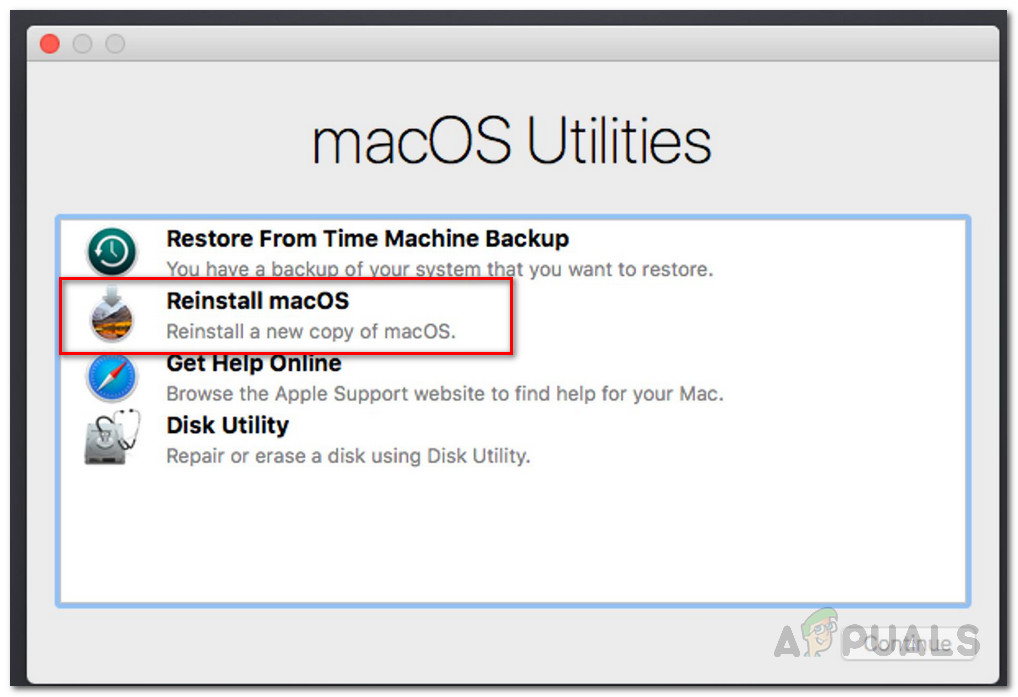
Method 3: Use macOS Recovery
You can also try to fix the issue by using the built-in macOS Recovery option in Macs. With the help of the macOS Recovery, users are able to install a certain version of the macOS depending on the key combination they press. This is really simple and easy to do. Follow the instructions down below to install the latest update for your Mac.
Method 4: Download the Update Manually
Finally, another way that you can get the update installed is to download the update manually from Apple’s website. When updates are released, they are often listed under the Downloads section on Apple’s website. Therefore, if you cannot get the update to install automatically, you can just download it from the website on your own and then install it once it is done downloading. This is rather simple to do. Go to Apple’s website and there, just search for the update that you are looking. You can check the version of the update that you need on the Software Update window. Once you know the version, just search for it and click on the Download button. After that, run the update to install it. See if that works out.
Why Every Mac Owner should Update to macOS BigSur 11.5.1How to Fix This Item is Temporarily Unavailable After Reinstalling Your MacOS or…Fix: How to Print Double Sided on a MacOSFix: Error Code 43 on MacOS