The problem of having two instances (or folders) showing in Windows Explorer only seems to be a cosmetic issue but it sometimes it isn’t. There are 3 variations (and possibly more) of this scenario. The problem basically occurs because of the Windows upgrade and drive name. If your drive was named SkyDrive in your previous Windows then upgrading to Windows 10 (where it is named OneDrive) causes this issue. Since the SkyDrive and OneDrive names are different, your system treats them differently and hence the 2 separate folders. This also is the reason for different data because some apps might still be set to store data in the older folder. If both of the drives have the same data and syncs correctly then it is mainly because of the issue with the Windows 10 and its upgrade. Whatever is the reason or the case, there are plenty of methods mentioned below so follow them one by one until your problem is solved. Note: It is advised to perform a backup of your data that is in OneDrive folders just to make sure no data loss occur.
Method 1: Unlinking and Linking the OneDrive
If you unlink the OneDrive and then re-Link it back then the problem might be solved. Follow the steps given below to unlink and re-link the OneDrive
Now restart your computer and check if the issue is still there or not.
Method 2: Reset OneDrive
Resetting OneDrive also solves the problem if the second instance is just showing in the File Explorer without any back link.
Now check your system tray (right bottom corner) and you should be able to see OneDrive icon disappear and reappear after a couple of minutes. If it doesn’t, you can restart the OneDrive yourself.
This should start the OneDrive again. Once it is started check if the extra instance is gone or not.
Method 3: Switching Accounts
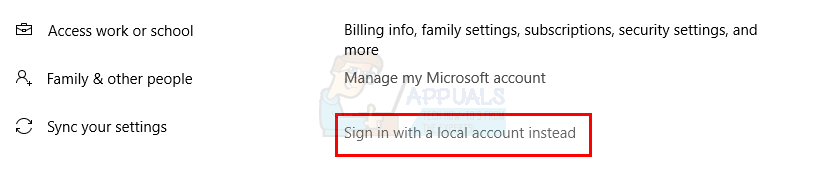
Switching from a Microsoft’s Account to a local account and switching back again to the Microsoft Account solves the problem. This is so because this process completely refreshes the OneDrive service which sometimes removes the extra instance of OneDrive Repeat the above steps with your local account and select Sign in with a Microsoft account instead in step 4 to switch back to Microsoft Account. Once you are done, check if the extra instance of OneDrive is gone or not.
Method 4: Using Registry Editor
You can also use Registry Editor to delete the registry of the extra OneDrive. This seems to work for most of the users. This should remove the extra instance folder showing up in the Windows Explorer. If it doesn’t work then restart the computer and then check.
Method 5: Using Registry Editor (Alternative)
This isn’t a solution but more of a hack to hide the extra OneDrive instance. This is suitable for people whose OneDrive instances properly sync and have the same data and can’t get rid of the extra folder for some reason. This solution will simply hide the extra folder and not purely remove it. This should hide the folder. If you want to reshow the folder again then just repeat all the above steps and make this value 1 again.
Fix: High CPU Usage by OneDrive ‘OneDrive.exe’Fix: OneDrive Automatically Deleting Files from OneDrive FolderWhat is Takeown and How to Use it to take Ownership of Files and FoldersOneDrive Connectivity Issues on Windows 7 and 10 [Fix]
![]()
![]()
![]()
![]()
![]()
![]()

![]()
![]()
![]()
