With the release of Windows 10, Apple has added a support for Windows 10 in their Boot Camp. So, it tends to lead us towards a fully supported dual boot option available on a Mac PC or Macbook.
Advantages of Dual Boot on a Mac PC:
Dual boot is always a requirement for extensive computer users. It provides the users with both, power and accessibility. There are some things that are not supported on Mac and on the other hand, there are those that are not available on Windows. So, Mac users can have advantage of using both OS and it is cost effective too.
How to install Windows 10 on your Mac with Boot Camp?
This process is a bit time consuming but by following the instructions, you will have a fully functional Windows 10 on your Mac. So, follow these steps carefully.
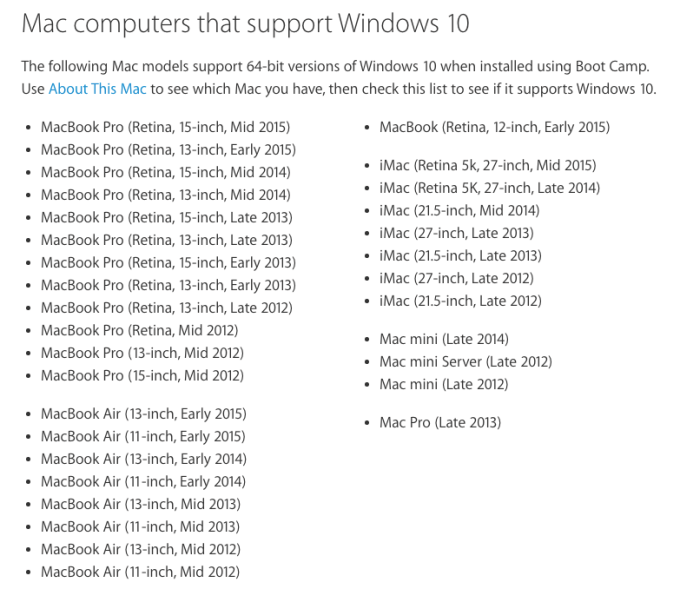
The first and the most important thing you need to know is the compatibility of your Mac with the Windows 10. You can see the image below in order to find whether your Mac will support it or not.
After checking for the support, now you need to download the Windows 10 on your Mac. You can get an ISO file from the Microsoft Website. If you are installing Windows 10 for the first time, then you would need a product key consisting of 25 digits. Also, make it sure that you have backed up your Mac to prevent data lost if something bad happens.
Now, go to your Downloads folder and see if the ISO file for Windows 10 has been downloaded. You would need a USB drive of 16GB in order to create a bootable USB consisting of Windows 10 files as well as Boot Camp related files. Boot Camp tool has been updated by Apple and it provides full support for 64-bit Macs.
Installation of Windows 10 on a Mac requires some free space on the Mac in order to reside Windows files and folders. So, make sure that there is at least 30GB of free storage available inside your Mac.
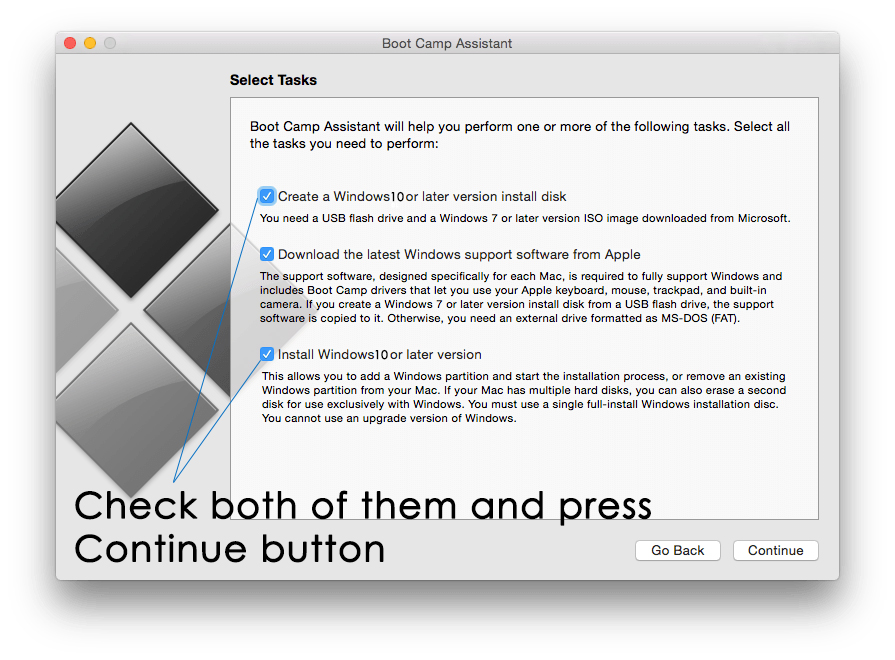
Now is the fun part because everything is ready to go. Plug-in your USB drive to your Mac and open the Boot Camp Assistant and check the following box i.e. Create a Windows 10 Install Disk and Install Windows 10. Click next after checking the boxes.
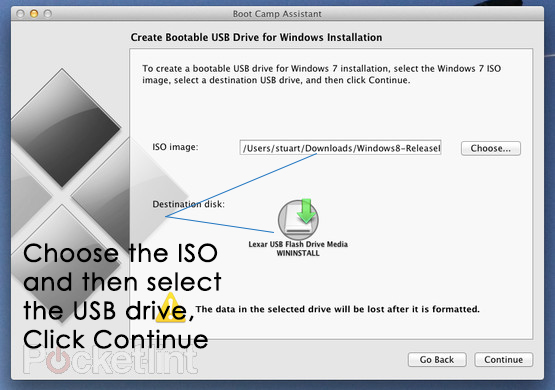
On the next screen, boot camp assistant will ask you to select the ISO image file of Windows 10 which you downloaded before. Select that ISO file and also select the destination USB drive where you want to load all the Windows 10 and boot camp files required to proceed further. Click Continue and it will start loading all the required files and in a few minutes, it will create a bootable Windows 10 USB.
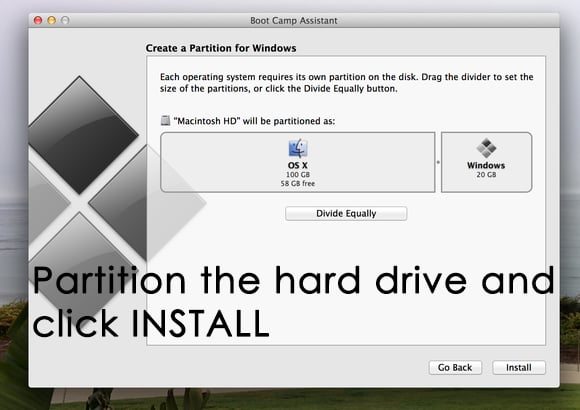
The next step is about partitioning the hard drive in order to give some space to Windows 10. Provide as much space as you can because Windows will wide-spread itself in the future.
Once you have partitioned the hard drive, click on Install and that should be a happy moment for you. Now, your Mac will restart several times and it would take a while to install all the components for Windows 10. You would also be prompted to insert the Product Key you got for yourself. Enter the key and continue with the process.
After the process is finished, your Mac should load you directly into Windows 10. But if it doesn’t, you don’t need to worry as you can always select the OS at the time of boot by holding the Command key. Select the Windows 10 from the list and you would be loaded into Windows 10 on your Mac.
Now, you would need to install drivers necessary for hardware to perform. Install the boot camp drivers by locating them inside the USB drive and run the exe file. It will install all of them and you would have a dual OS booting Mac.
Apple Mac With ARM CPUs Instead Of Intel’s x86 Chips Won’t Allow Running Windows…Fix: Windows 11 Won’t Boot After Enabling Secure BootWhat Does the Linux Mint Dual Boot Automatic Install Utility Mean When it Asks…How to Fix Mac Stuck on Setting Up Your Mac