Installing shell themes is generally quite safe, it just involves modifying some Windows .dll files – please note that if ever you run /SFC in the command prompt, your modified .DLL files will get overwritten with the original ones from Windows, which will break your shell themes. But its easy to just modify them again. The screenshots below are using Life by Lefty1981 shell theme, because once you go black you never go back, but you can find a ton of shell themes to suit your preferences on websites like DeviantArt and Windows7Themes.
Requirements:
A Windows shell themeUniversal Theme Patcher (patches a few other necessary .DLL files)(Optional alternative to above) Theme Resource Changer
After downloading the shell theme of your choice, launch one of the resource patchers from above, either Universal Theme Patcher or Theme Resource Changer. Theme Resource Changer will need to be installed (in x64 or x86 compatibility), so run the installer as an administrator. Universal Theme Patcher on the other hand just patches the necessary .DLL files without installing itself as a program. The choice of which to use is up to you. In either case, these programs will patch the following Windows files:
Uxtheme.dllThemeui.dllThemeservice.dll
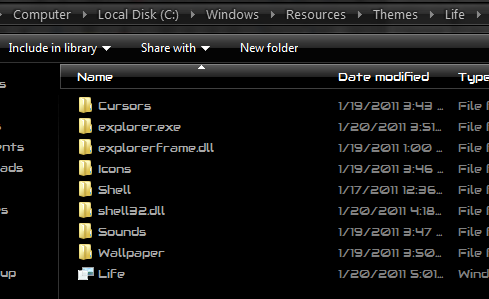
Now, your shell theme’s folder (once unzipped) probably came with a lot of folders and files, so here’s a general explanation of them:
Explorer.exe: This will typically change things like the Start orb.Explorerframe.exe: Typically includes images to replace things like forward/back/exit buttons on menus.Shell32.dll: Changes the appearance of control panel icons and things like that.
Shell themes generally come with instructions and descriptions of all the extras they include, so be sure to go through the readme of whatever shell theme you’re installing to know exactly what is being changed. Your shell theme should’ve also came with a self-installer with a .theme extension. Once you run that, it should install most of its necessary files to the following directory: However, there may be a few files you need to manually install to: This can be things like ExplorerFrame.dll and TimeDate.CPL For doing this, you need to take ownership of the files in both system32 and sysWOW64. So for example we are going to overwrite the ExplorerFrame.DLL in both /system32 and /sysWOW64 with the ExplorerFrame.dll files from Life theme, which will allow us to change the various explorer frame buttons. What we need to do is open an elevated command prompt (Start -> CMD – > Open as Adminstrator) Then type into the command prompt the following commands:
Now you will go into both folders, right-click the ExplorerFrame.DLL files and go to Security tab -> Edit -> highlight your username for your PC -> hit the checkbox for Allow Full Control, as seen below.
You should now be able to replace those ExplorerFrame.DLL files with the ones that came included with your shell theme. You can do this for any other files included in your shell theme that need to be placed in the /system32 and /syswow64 folders.C
How to Install Windows 10 Custom ThemesGoogle Chrome is Finally Getting Material You Style Dynamic ThemesHow to Create Samsung Themes for TouchWiz Theme Engine Devices[FIX] ‘Shell Infrastructure Host’ High CPU Usage on Windows 11