Basic info on today’s mission
If you don’t know already, that K at the end of its respective name represents the fact that its core clock multiplier is unlocked. In other words, this means that you can freely increase the core clock multiplier of the CPU in order to increase its overall performance, which is exactly what we are going to be showing you today. Keep in mind that we are not going to go easy on it – we will teach you how to pair your i5 with some of the best price / performance parts to see how far can it really go. Our desired core clock is going to be around 4.7Ghz which is shocking compared to its stock 3.5GHz ( base clock ) and 3.9 ( with Intel’s Turbo Boost technology ). Hopefully, with our instructions you will be able to reach those heights and get that extra bit of free power from your CPU. So, without further adue, let’s jump straight to work.
Preferred components for overclocking i5 6600K
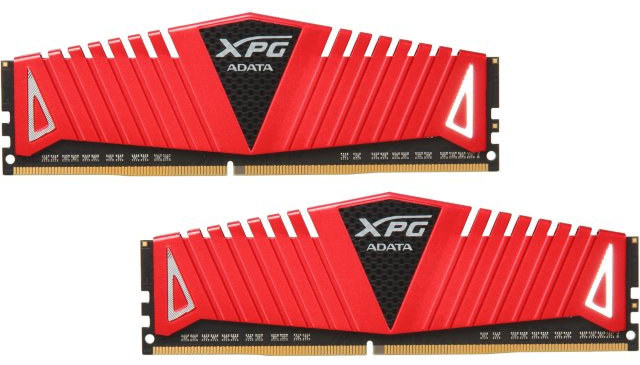
Pair it up with 16 gigs of decent DDR4 RAM cards and you will be all set up. Once again for the sake of doing this the best way we recommend you opt for the Adata XPG DDR4 memory which runs at 2400Mhz. This will ensure that you have a proper base for your new gaming rig.
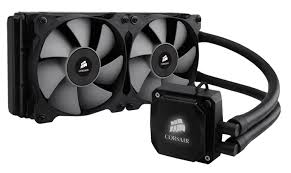
Now, if you are up for some serious overclocking you will need to invest in a proper cooling system for your CPU and you cannot go wrong with Corsair’s Hydro H100i liquid CPU cooler. It shows great temperature drops in a variety of benchmarks which makes it the best price / performance CPU cooler under $100.
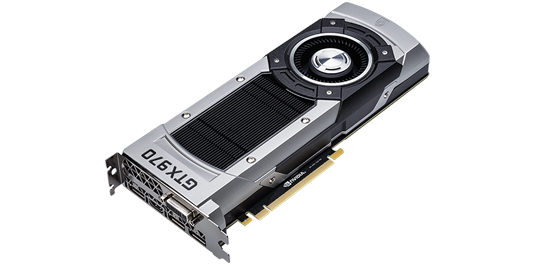
For your GPU, you cannot go wrong with the nVidia GTX 970 which provides amazing performance for a reasonable price. If you are one of those people who are into new stuff, you can also wait a couple more months to get your hands on the brand new 1080 or 1070. They both promise twice the performance of 980s and even the beast itself – Titan X.
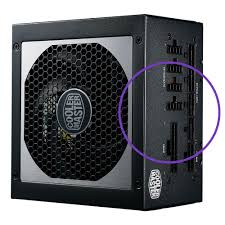
And finally, you will need a juicy PSU that will be able to handle all of the above mentioned components without worrying about damaging any of them. For this occasion we recommend the CoolerMaster’s V650 semi modular PSU which is rated as 80 plus gold efficiency and marketed as “6th Gen Skylake Ready”.
Now that we have went through all of the desired components, now comes the easy part – the actual overclocking. Truth be told, overcloking can get tricky from time to time, especially if you don’t know what you are doing and / or you do not have a proper overclocking setup; but if your rig is similar to the one we listed above you will have no problems with overclocking it.
Let’s get ready tooooo overclock!!!
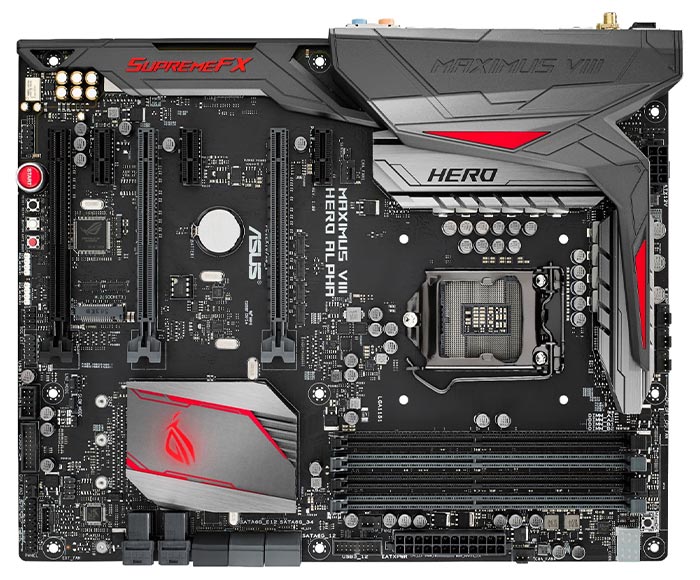
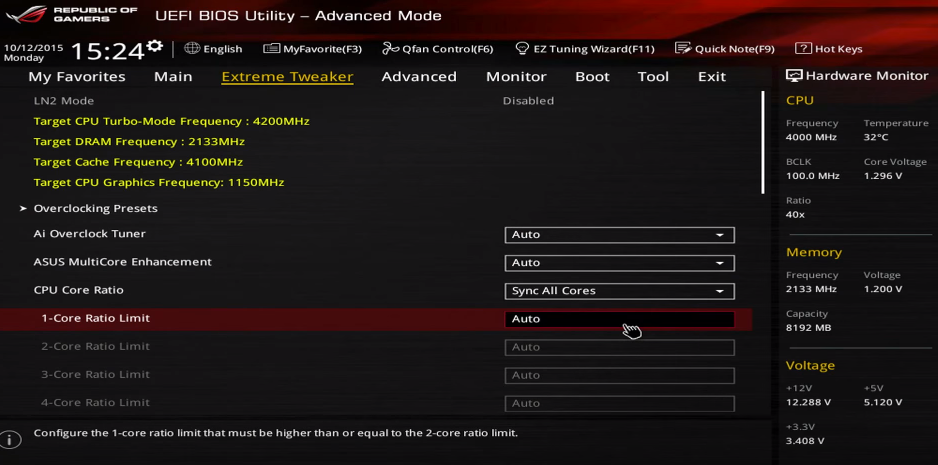
Now that you have everything set up nicely, start off by turning your rig on and, depending on your motherboard’s manufacturer, spam press F8, F9 or Delete until you get into the BIOS. If you have the Asus ROG Maximus VIII Hero this is how your bios will look like once you enter it:
Now, after you have entered the BIOS you will want to navigate to the Advanced Settings Tab, Overclocking Settings Tab or something like that, depending on your motherboard. In this case, if you are using the Maximus VIII Hero you will want to navigate to the Extreme Tweaker Tab where you will be able to find all the required settings. Now keep in mind that there are 2 ways of overclocking your CPU:
Increasing the base clock of your CPU ( also known as BCLK) – this method can be quite dangerous if you do not know what you are doing, but it is available on virtually all setups.Increasing the multiplier of your CPU( also known as Ratio ) – this method is not nearly as dangerous as BCLK OCing because all it does is increase the CPUs multiplier; it does not temper with the base clocks of your CPU.
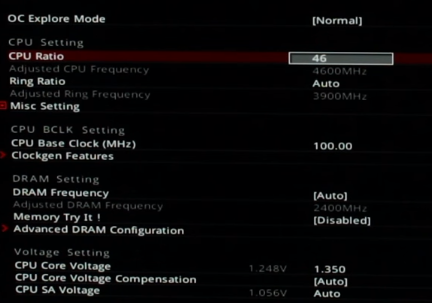
Today, we will be focusing on the multiplier OCing because it is the easiest, safest and most effective way of overclocking. With this being said, your job is pretty straightforward from here – simply increase the multiplier / ratio to your desired number. Your i5 6600K’s default multiplier is 35 and you can go ahead and increase it to 42. After you do this, you will need to scroll down to the voltage settings and give it a slight increase there as well. In order for a 6600K to run @4.2GHz you can set the voltage at around 1.250 – 1.260. This will give your CPU a boost of 7% meaning it will run on 4.2GHz … but this is not nearly enough to satisfy anyone’s needs because virtually all i5 6600K CPUs can run on 4.2GHz without having to tweak the voltage settings much or worry about their safety. With this being said, if you have the setup listed above you can go ahead and raise the multiplier to 46 which will squeeze a bit more juice out of it. Keep in mind that, after raising the multiplier, you should also raise the voltage to around 1.350 so it can run properly without crashing.
If this is not enough for you and you want to go all crazy with it, with the build above you can even go 47+ which will give you more than 10% performance increase. Keep in mind that you should stress test your CPU after each succesfull OC boot. Make sure you do this with benchmarking tools such as GeekBench, PCMark, CineBench etc. This will put your PC under great load which can result in occasional crashes if your CPU cannot deal with your OC settings. If this happens, simply reboot your PC, enter the BIOS again and decrease the multiplier and voltage settings and do the stress test again. In other words – keep doing the stress test until your CPU is able to withstand it without crashing. Now that you have did your best with the overclocking, you can do some gaming benchmarks as well, just to make sure everything is working properly. With the build mentioned above and with the CPU increased to cca 4.7Ghz, you will have no problem with running games such as The Witcher 3, Metal Gear Solid V, Battlefield 4 with Ultra settings on 1080p ( even 1440p if you are lucky enough ) with constant 60FPS. Well, ladies and gentlemen, boys and girls, we have come to the end of our overclocking guide. We hope that we were easy to follow and interesting at the same time. We also hope that you found lots of useful information in this guide and that you managed to get the last drops of juice from your CPU by overcloking it to its limits and also that it increased the performance of your rig whether for gaming or video / image editing. Until next time, stay safe and keep those multipliers as high as you can!
The Real Reason Apple Went For ARM CPU Transition: Intel’s Skylake Exhibit…How to Use AMD’s Ryzen Master 2.2 (May 2020 Edition) to Overclock your CPUHow to Overclock The Refresh Rate of Your Ordinary Old MonitorHow To Overclock Your RAM for Ryzen Using The Ryzen DRAM Calculator