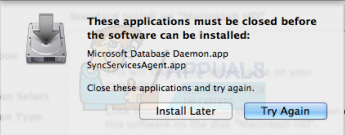
Just because quitting the SyncServicesAgent process is something that not many Mac users know about does mean that it is something that is hard to do – in fact, quitting the SyncServicesAgent process is pretty easy and can be accomplished using a variety of different methods. The following are some of the most effective methods that can be used to quit the SyncServicesAgent process in order to update Office 2011 on a Mac, so if one doesn’t work for you, simply move onto the next:
Method 1: Log out and then log in while holding down the Shift key
Log out of the Mac using the option found under the Apple in the Menu bar. Hold down the Shift key, and while doing so, log in to the Mac. This will log you in to the Mac but will disable all startup items, including hidden items such as the SyncServicesAgent process. This feature is kind of like a much simpler but also much less potent Safe Mode. Run the updater for Office 2011.
Method 2: Restart the Mac in Safe Mode
Restarting the Mac in Safe Mode will result in the computer starting up with all of its third-party startup items, including SyncServicesAgent, disabled. To restart the Mac in Safe Mode, you need to: Shut the Mac down. Start the Mac up and, as soon as you hear the signature Mac startup chime, press and hold down the Shift You can release the Shift key when the login screen appears (with the words Safe Boot written in the top-right corner of your screen). Log in to the Mac. Update Office 2011, and once it has been updated, restart your computer, starting it up like you normally would in order to have it boot up with all of its startup items enabled.
Method 3: Manually quit the process using the Activity Monitor
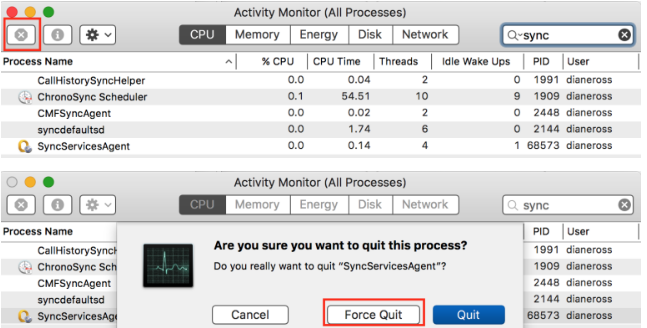
Navigate to Applications/Utilities and launch the Activity Monitor. Search for “sync” using the Search box in the top-right corner of the Activity Monitor. Locate the process named SyncServicesAgent, click on it to select it and click on the Force quit button (the X in the top-left corner of the Activity Monitor). In the resulting popup, click on Force Quit to confirm the action. Go ahead and update Office 2011.
Restart the Mac, and all will be back to normal.
Method 4: Move SyncServicesAgent to the Desktop and then quit it
Navigate to Finder/Applications/Microsoft Office 2011/Office. Locate app and drag it to your Desktop. This will prevent the SyncServicesAgent process from restarting once it has been force quit. Use steps 1-4 from Method 3 to force quit the SyncServicesAgent process using the Activity Monitor. Once the SyncServicesAgent process has been force quit, update Office 2011, and it should update without any issues. Once Office 2011 has been updated successfully, drag app back from your Desktop to Finder/Applications/Microsoft Office 2011/Office. Restart your computer, and order shall be restored.
Method 5: Unload SyncServicesAgent from launchd
In many cases, the SyncServicesAgent process simply re-launches every time the user quits or force quits it using the Activity Monitor. This happens because the SyncServicesAgent process is running under launchd, and if that’s the case, it can be killed by simply unloading it from launchd. In order to do so, you need to: Navigate to Applications/Utilities and launch the Terminal. Type the following into the Terminal and press Enter:
Use steps 1-4 from Method 3 to force quit the SyncServicesAgent process using the Activity Monitor. Run the Office 2011 Updater, and it should update Office successfully.
Method 6: Kill SyncServicesAgent using the Terminal
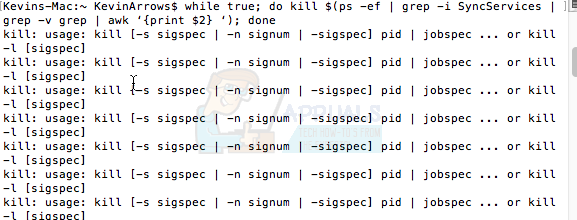
This is not only the most extreme method that can be used to quit the SyncServicesAgent process to update Office 2011 on a Mac but is also the most effective one. In order to use this method, you need to: Navigate to Applications/Utilities and launch the Terminal. Type the following into the Terminal and then press Enter to execute the command:
You are going to see something similar to the following image, with all of those identical lines basically meaning that the SyncServicesAgent process is being actively and continually killed.
With the Terminal still open, run the Office 2011 updater, and Office 2011 should update successfully. Once Office 2011 has been updated, head back to the Terminal and press Ctrl + C to stop the continuous killing of the SyncServicesAgent process. Close the Terminal. Restart your Mac. Restarting your Mac after using this method and updating Office 2011 will force a specific and necessary file which stores the version info to update Office 2011, a file that is sometimes missed and ends up causing problems during the next Office update.
How to: Completely Remove Office 2011 From MacHow to Fix Error Reference Source not Found when Printing from Office 2010,…Fix Microsoft Office ‘Error Code 30088-26’ when Updating OfficeHow to Use the Force Quit Command on a Mac


