However, there is one aspect of remote control that many people are either unaware of or perhaps they think that it’s too hard to execute and so it remains largely under-utilized. I am talking about the ability to remotely control out of band computers. This has been made possible through the development and incorporation of Intel Active Management Technology (AMT) on the latest generation of Intel Core processors.
How to check whether your computer supports Intel AMT
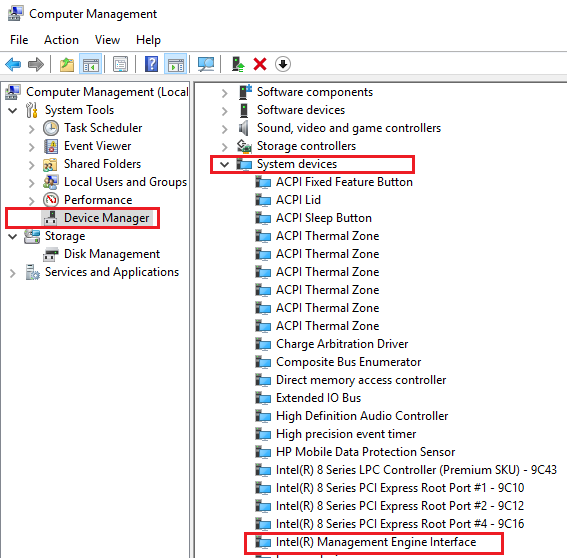
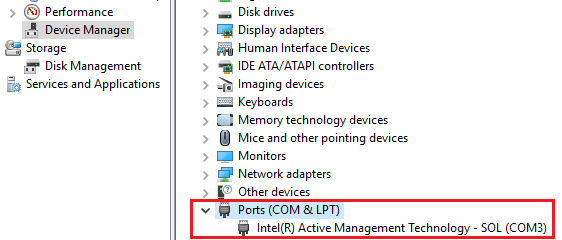
The simple way is checking to see if your computer has the intel vPro sticker. It should look something like this. Alternatively, you can run the Intel Setup and Configuration Software (Intel SCS) which collects information about Intel AMT and Intel Management Engine (Intel ME). You can also check this information from your Device Manager. Navigate to the System Devices option and check the current firmware version of the Intel Management Engine software. Then head over to the official Intel site to check additional information about your firmware. Only specific firmware versions are compatible with AMT. Also at the device manager, you can check to see if your device has an Intel AMT port. If your computer is compatible with AMT it’s now time to proceed with the next step. Configuring AMT from the BIOS. All computers ship with the technology disabled by default.
How to Activate Intel AMT
Open the Intel ME setup on your BIOS
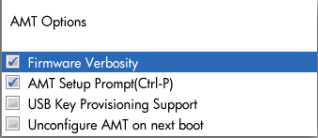
There are different ways to do that depending on the type of computer you are using. For some computers, the setup is available directly from the BIOS setup. But for other computers, you will first need to enable firmware verbosity and AMT Setup Prompt from your BIOS configuration. Once that is done, restart your PC and right after the prompt to enter your BIOS you will be prompted to press CTRL+P so that you can access the Intel ME setup. If you don’t see any of these options then it’s probably because your computer is not compatible with Intel AMT.
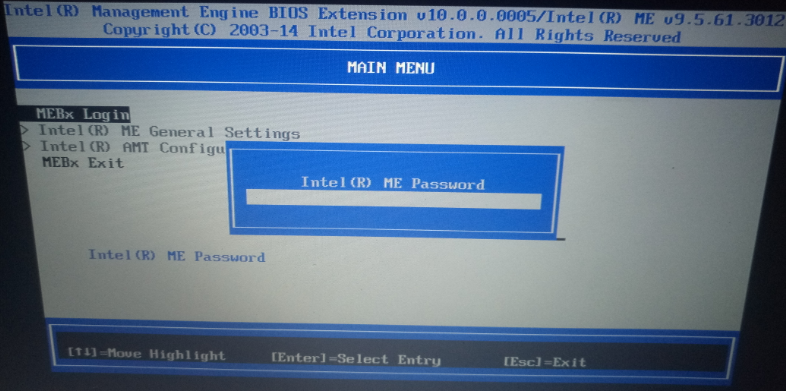
Log in to the ME setup
Use admin as the default password and then proceed to create a new password. This will also be the password that is used to authenticate the remote controller before they can gain access to your PC. There are some guidelines to be followed when creating the new password. First of all, it needs to be at least 8 characters long. Then it needs to include at least one uppercase letter, a lower case, a number, and a symbol.
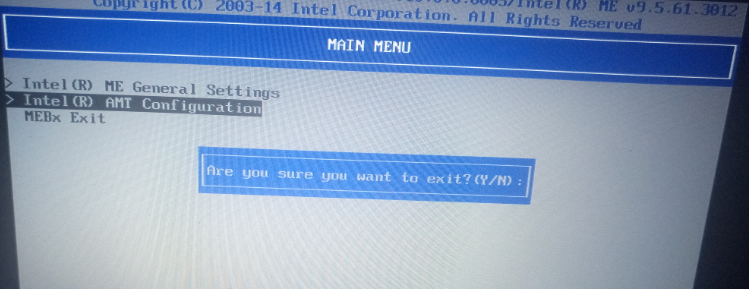
Configure AMT
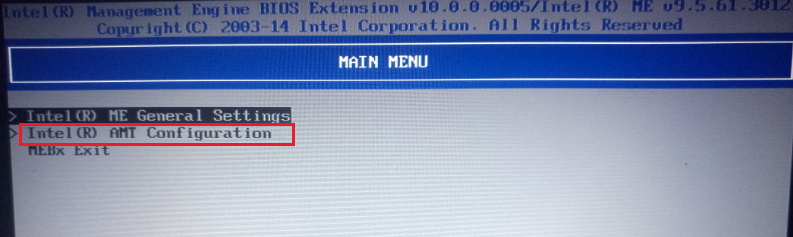
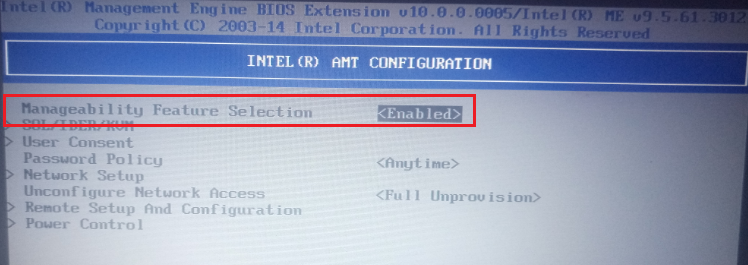
When the main menu opens, select the Intel AMT Configuration option and make the following changes.
- Enable Manageability Feature Selection.
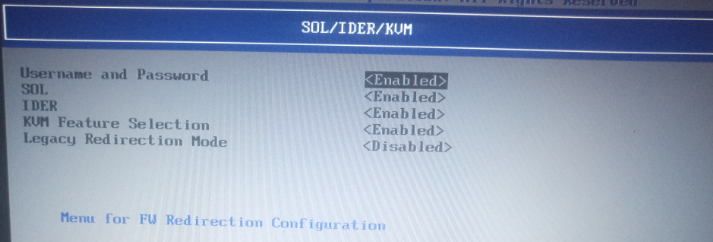
- Open the SQL/IDER/KVM section and ensure that the three options are enabled. You will also find another section here called legacy Redirection Mode. Ensure that it is enabled too. For some computers, KVM configuration is available as its own section.
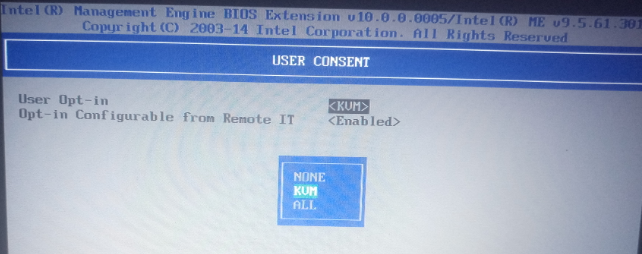
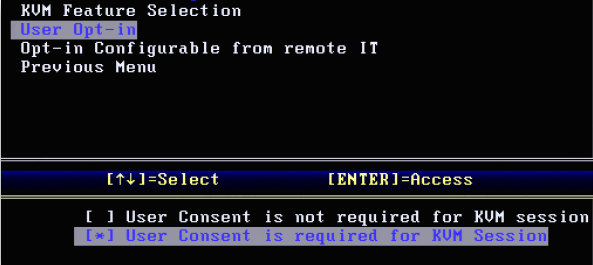
- Go back to the AMT configuration Menu and open the User Consent section. Click on User Opt-in and select none. This will allow the remote controller to access this PC without having to ask for your consent every time. Next, open the Opt-in Configurable from remote IT and enable it. This means the remote computer can modify the User Opt-In preference that you just set. The computers that I mentioned in step 2 that have KVM Configuration as its own section do not have a User Consent section. Instead, the steps in this process will be executed as part of the KVM configuration.
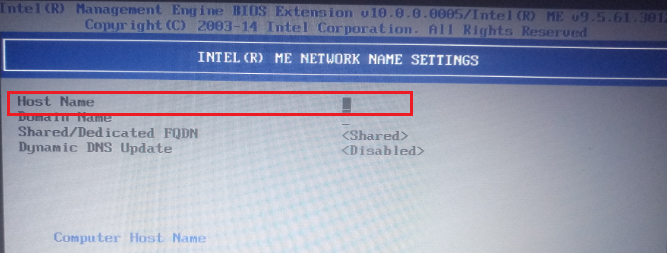
- Go to Network Setup and select the Network Name Settings option. This will allow you to assign a name for your computer which the remote controllers will use to identify you. We recommend that you use your existing computer name to avoid DNS conflicts.
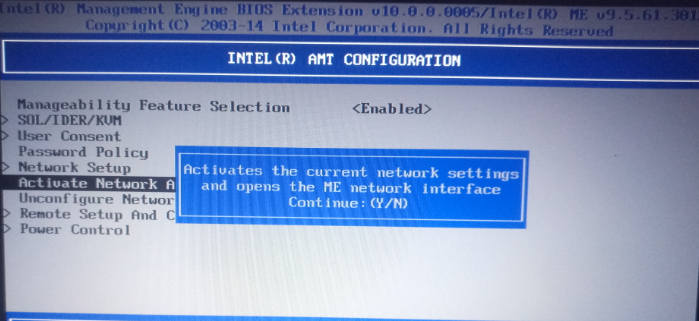
- Activate Network Access under the Network Setup option. A pop up will appear asking you whether you want to continue. Enter Y for Yes. And You are done. Press the escape button until you are prompted to exit then Enter Y for Yes.
How to Initiate a Remote Connection Using Intel AMT
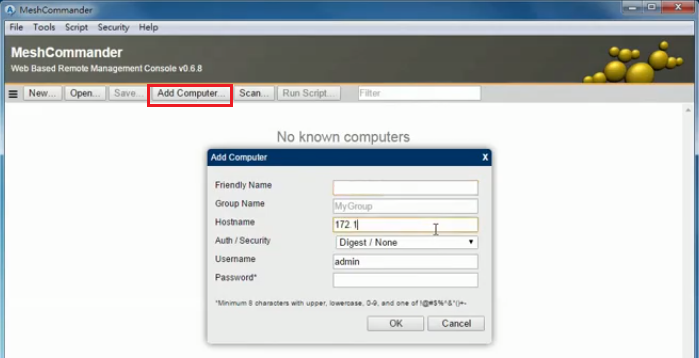
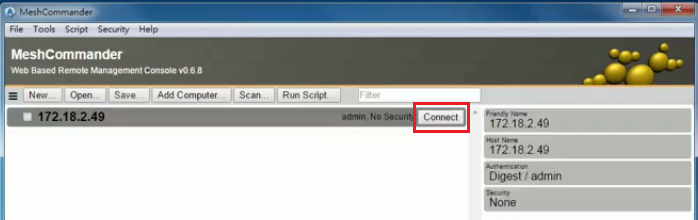
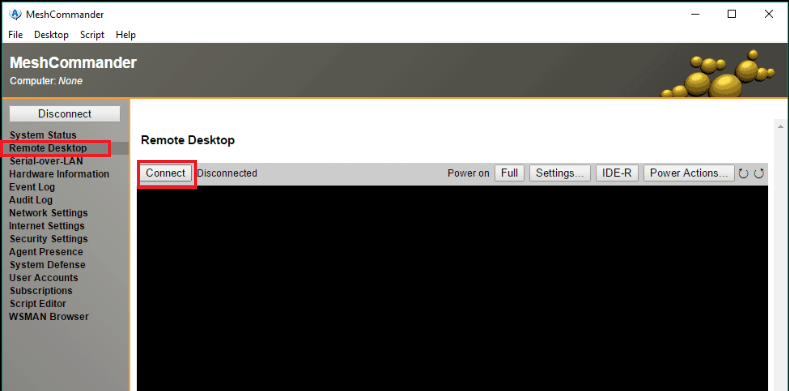
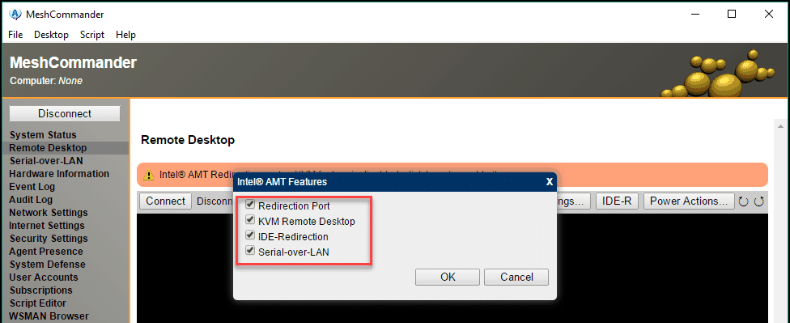
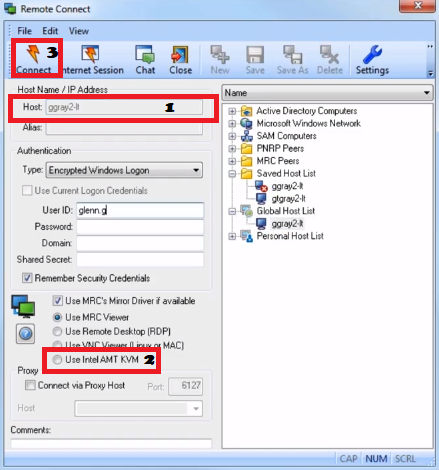
So the remote computer is all set up. What remains is a dedicated software on the remote controller that will allow you to send remote connection requests using Intel AMT. Unfortunately, most of the standard remote desktop software lack this feature. So, I am going to recommend two software that you can use based on the environment you are in. The first is Dameware, a comprehensive software by SolarWinds that is suited for use in business environments that have a huge number of remote computers to be accessed. Then the second is MeshCommander. A free and open-source software that will be more suited for basic use. Intel also has its own tool, the Management Command Tool, but it is quickly being replaced by MeshCommander. Once you have installed Dameware, Launch the Mini Remote control (MRC) and open the Remote Connect dialogue box by clicking the dedicated icon on the MRC taskbar. Enter the remote computer’s IP address on the designated field. Dameware also automatically discovers remote hosts in your network and will display them on the left pane of the Remote Connect dialogue box. This eliminates the need to manually enter the IP address and instead select the computer from a list of available devices. Once that is done select the option that is labeled Use Intel AMT KVM and click on connect. You will be prompted to enter the password. Use the password that you used to configure AMT on the remote control and you are in. You can now proceed with your remote tasks. Once MeshCommander is installed, Launch it and select the Add Computer option. You will be prompted to add a Friendly name for the remote computer and also its IP address under the Hostname field. For the Password section, use the password you created when logging in to the Intel ME setup. Click OK to proceed and on the next tab that appears, click Connect to proceed. On the next Window, click the remote desktop tab and then connect. You can now proceed with your remote control tasks. If you encounter a red banner notifying you that Intel AMT Redirection port or KVM feature is disabled, then you can click on it, to enable them. Although this should not be a problem because we enabled the settings in the Intel ME Setup menu.
Fix: This app has been turned off and is not monitoring your computerHow to Fix ‘The Cycle Frontier Has Crashed’ Error on Windows?How to Fix Back 4 Blood Game has Crashed Error on Windows?How to Configure and Securely Connect Remotely on a Windows Server using Radmin?


![]()

![]()