However, the drawback to rooting is that it will disable the OTA Updates, which means you will not be able to get updates automatically. Before you continue with the steps listed in this guide; you acknowledge and accept that any damage to your phone caused by your attempts to root your phone is your own responsibility. Appuals, the (author) and our affiliates will not be responsible for a bricked device, dead SD Card, or anything to do with your phone. If you don’t know what you’re doing; please research and If you do not feel comfortable with the steps, then DO NOT PROCEED. The ZUK Z1, made by Lenovo, is a flagship grade device that was released in 2015 it features a metal frame with Gorilla Glass 3 protected screen, and a curve on the back that is claimed to offer an ergonomic feel. It has a huge 4100mAh that supports Fast charging through its USB type C port. It’s powered by the Qualcomm Snapdragon 801 with 3 gigabytes of ram and 64 of ROM. The LCD IPS display is 1080p 5.5″. The Sony camera sensor has a f/2.2 aperture and has 13 MP pixels and Optical image stabilization. There are two ways to root your Lenovo ZUK Z1 and we’ll list them both in case one does not work for you. One of them uses King root application and the other uses Framaroot application, both are one click root applications that aim to make the rooting process as easy as it gets.
Method 1: Using the King Root
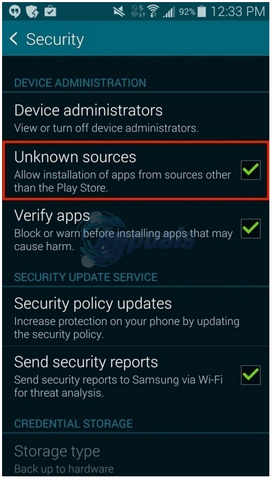
For this method we are going to use King Root application, first kindly check that both Unknown Resources and USB debugging mode are enabled by going to Settings -> Unknown Resources and enable it by clicking on the button.
And then enable the USB Debugging Mode. Go to Settings -> Developer Options and Enable Usb Debugging Mode, if you can not see Developer Options then you will need to go to Settings -> About Phone and tap on the Build Number until a message is presented and tells you that You are now a developer
When done download the king root application from here and install it. Once installed open the application and you should see Try to root button which you will need to click.
Let the process run for a few minutes and when done download the terminal emulator application from here (from your phone) and then download this script from here and unzip it.
Send the extracted folder to your internal storage and then run the terminal emulator and type SU (without the quotes) and accept when it asks you for permission and then type sh /sdcard/mrw/root.sh in the terminal emulator, it might display errors but in the end it will launch Super SU, when it asks you to update the binaries , make sure to choose Normal not CWM / TWRP.
Method 2: Using Framaroot
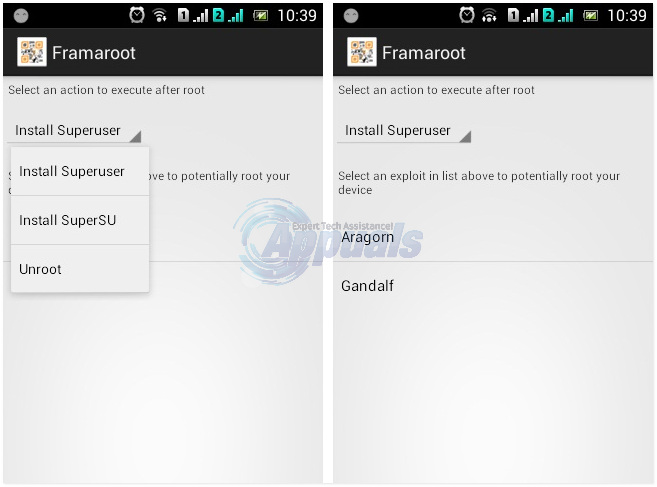
Using your phone go to Settings -> Unknown resources and enable it by clicking on the button then check that your phone is at least 50% charged so it does not run out of battery during the process, next download Framaroot application from here, after downloading it install framaroot. You want to make sure that you enable the USB Debugging mode so go to Settings -> Developer Options and Enable the USB Debugging mode. If you can not see developer options then you will need to go to Settings -> About Phone and tap on the Build Number until a message is presented and tells you that You are now a developer. After enabling the debugging mode run the framaroot application from home screen, you installed earlier and you will find an option to Install Super SU choose that option and press on it and wait for your phone to be rooted, once rooted reboot your phone and it should be ready!
How to Flash CyanogenMod 13 for Lenovo ZUK Z1How to Root Lenovo TAB3 8Fix: root User’s Home Directory is /rootHow to Root Your Nexus Phone using CF-Auto-Root