Nexus phones are developer friendly, therefore their rooting process is easy and available. Today we are going to use CF-Auto root to root Nexus devices, and we will add the Moto series (including Moto G, 4G, first and second generation, and also the Moto X, first, second and Pure edition), CF-Auto root is a script that allows you to root your phone and unlock your boot loader with minimum work and least modifications. Before we begin; please check your model # (variant) by going to Settings -> About phone -> Model number and take a note of it. Next, download CF-Auto-Root file that you are going to use to root your phone from here. You will find the nexus models under the section titled Fast boot flashable devices, search for your devices model number and use the corresponding download link to download the files. If you are trying to root a MOTO series phone, please check that your phone is on the required android firmware in the 8th column from the left, if you do not know what firmware you are on, you can look it up in Settings -> About phone -> Android Version
Next, make sure the following requirements are met
a) Your phone compatible with CF-Auto-Root
b) Access to a laptop or computer with a USB port
c) A USB cable to connect your device with your laptop
d) Battery should be charged
Before starting the root process, please know that if you have not rooted your phone before you are going to lose all your device’s data, so please make a backup for any precious information.
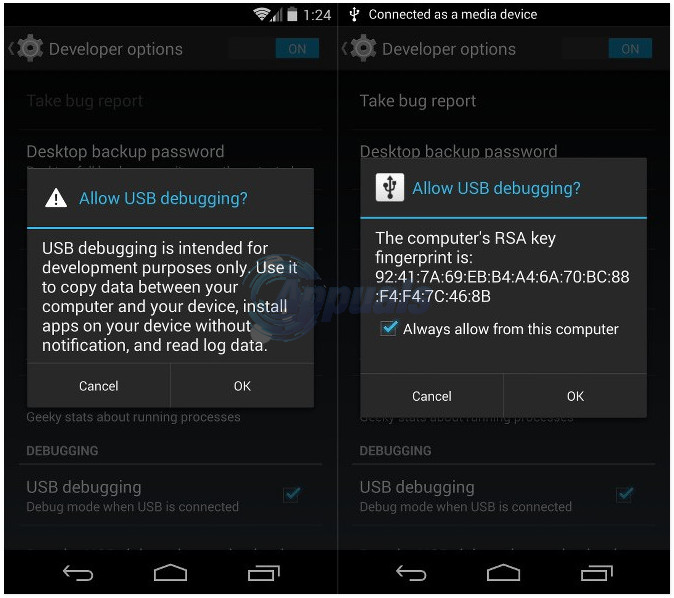
Once ready, Turn on ADB debugging. To do this, go to Settings -> About Device -> Software Info -> Build Number and tap on it about 7 times or until you see a message saying You are now a developer, Once you see it; Go to Settings -> Developer Options to Enable USB debugging, Also please make sure “Allow OEM Unlock” option is enabled, you will find it in the same menu, if you do not find it then it is already enabled.
Right now, please download the Google USB drives from here and install them, next extract the zip file you downloaded from the cf auto root website and run file, you will find it in the folder you just extracted into.
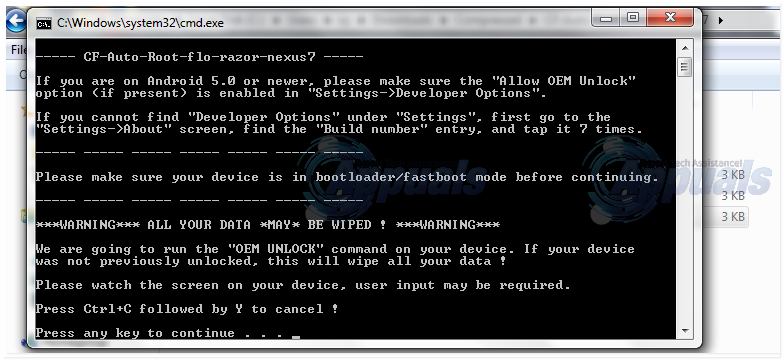
Now turn off your device and boot it into boot loader/ download mode, this can be done in different ways for different phones, please either try holding VOL UP + VOL DOWN + Power button and if that does not then holding VOL DOWN + Power button should work. Once your phone is booted into boot loader mode connect the device to your laptop using the USB cable and press any key in the root-windows console window and your phone should begin the process of rooting. Once done, reboot your phone, root access will be obtained and SuperSU (an application that gives other applications root access) will be installed.
How to Root Your Samsung Phone Using CF-Auto-RootFix: Nexus Mod Manager wont LaunchFix: Nexus Mod Manager “A problem occurred during install”Fix: Nexus 7 Won’t Turn On