Connecting a USB Printer to Airport Express
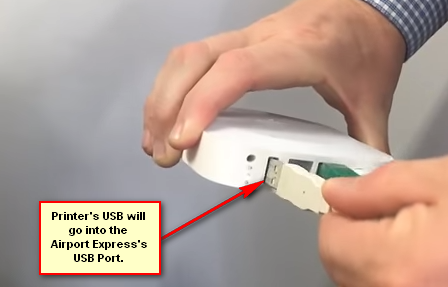
Connect one end of your printer’s standard USB cable into the printer and connect the other end of USB cable to Apple’s AirPort Express.
Turn on the power of your printer and Apple’s AirPort Express. Your printer is now connected to the Airport Express. Now, in order for the printer to show up on your network your Mac or PC must also be connected to Airport Express. What this will do is share your USB Printer over the Network. Assuming that you are connected to the Airport Express or Extreme, go to System Preferences -> Print & Scan and click the + symbol to add the printer. This method is not limited to Airport Express or Extreme, as long as your router supports usb devices, this method can be applied onto any of them. In addition to wireless printing, you can use your AirPort Express to set up AirPlay or access the internet. You can also use it to create or extend your existing Wi-Fi network. Download AirPort Utility from here. This utility lets you see your network graphically, change network settings and more.
Apple AirTags Help Law Enforcement Apprehend Airport Luggage ThiefHow To Turn Almost Any Printer Wireless Using Raspberry Pi?USB 2.0 vs USB 3.0 vs USB 3.1: Which should you Have and Why?How to Connect Android to Wireless ADB for Wireless Screen Mirroring