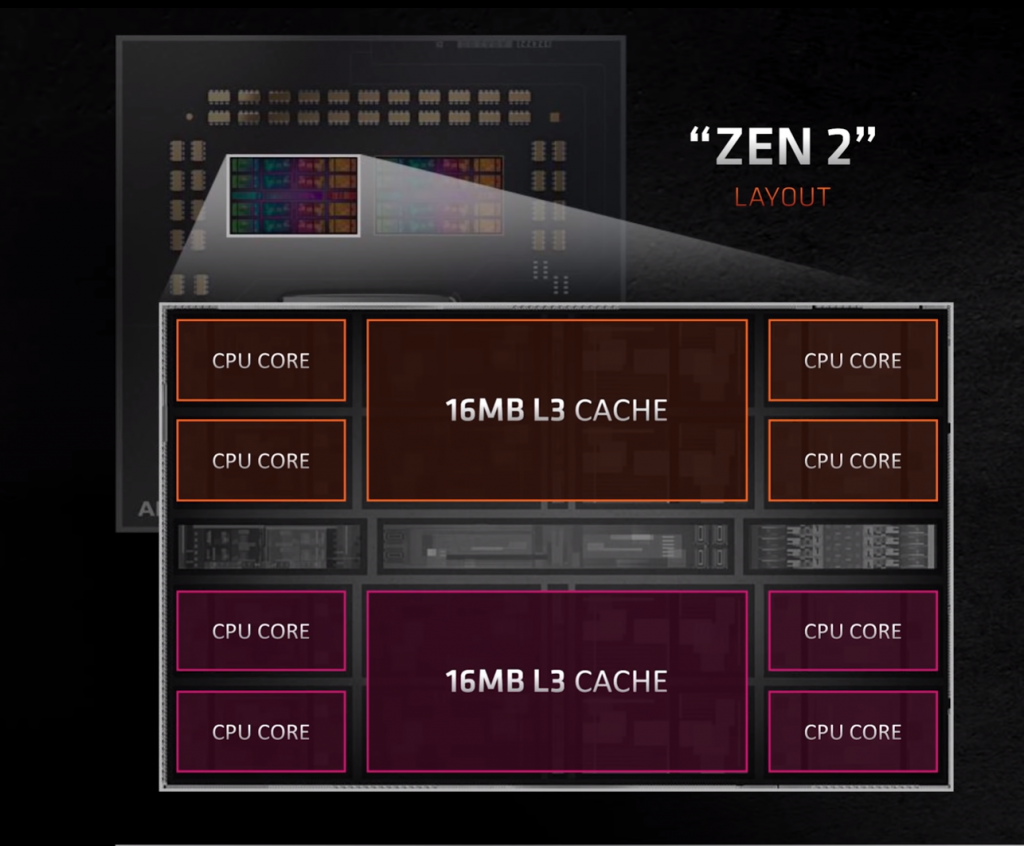
In 2020, AMD finally announced the brand new Ryzen 5000 series of CPUs based on the new Zen 3 architecture. These CPUs were produced on the same 7nm process node that was used in the production of the Ryzen 3000 series but were much more refined in terms of architectural design. AMD made drastic changes to their chiplet-style design of Core Complexes, which resulted in tremendous improvements in gaming performance due to reduced latency. Finally, after almost a decade, AMD had a line of processors that could beat Intel’s best offerings in raw gaming as well as productivity performance. While the modern offerings from both Intel and AMD are extremely solid, enthusiasts are always looking for that extra bit of performance through manual tinkering. Most PC building enthusiasts consider overclocking a hobby and they indulge in the practice simply because it is an exciting process. Overclocking the new Ryzen 5000 series CPUs is a little bit different than previous traditional methods of overclocking, and this guide will help you through the process.
Modern Overclocking
It is no secret that modern CPUs do not have a ton of headroom for manual overclocking. Due to the rising performance demands, manufacturers are already shipping their CPUs clocked pretty high with negligible performance headroom, if any. The situation is a little better with Intel CPUs, which still have a bit of overclocking overhead with their K-series SKUs. However, even Intel is struggling more and more due to their archaic 14nm manufacturing process. Increasing the clock speeds of a CPU on this aging node is a challenging task due to the increasing power demands of the processor at those high clock speeds. AMD, on the other hand, takes a very conservative approach to overclocking. AMD’s Ryzen CPUs do not clock as high as comparable Intel CPUs, but they do hold a significant advantage when it comes to IPC. AMD does not focus much on manual overclocking, rather they have devised technologies that can improve the normal boosting behavior of the CPU automatically. The aggressive boosting techniques of the AMD Ryzen CPUs, combined with their already high boost clocks means that there is not a lot of manual overclocking headroom in AMD CPUs.
AMD Overclocking
Traditionally, AMD CPUs have not been the best specimen for extreme overclocking. AMD focuses much more on the automatic boosting techniques and allows the CPU to overclock itself under specific conditions, thus saving the user from the hassle of manual overclocking. If the user does choose to do complete manual overclocking, then they have to give up either some single-core or some multi-core performance in order to achieve a fixed overclock. This is not the greatest idea therefore many enthusiasts have shied away from AMD overclocking in the past. AMD has also introduced techniques like Precision Boost Overdrive which is sort of an automatic overclock for the CPU but keeping the boosting behavior intact. The traditional auto overclocking approach completely disables the boosting behavior of the CPU and provides you with a fixed overclock that is usually not the most fine-tuned overclock either. With PBO, however, AMD has introduced a new form of aggressive boosting that takes into account the various parameters related to the CPU such as its temperature, power draw, and voltage, and thus devises a boosting pattern based on those parameters. It is essentially an extension of the traditional Precision Boost 2.0 boosting algorithm.
Voltage Curve Optimizer OC
Voltage Curve Optimizer overclocking is actually a type of undervolting that is becoming quite popular among AMD overclockers. Curve optimizer is a part of the Precision Boost Overdrive algorithm and is therefore inherent to all AMD CPUs but currently, it is only available on Ryzen 5000 series CPUs based on the Zen 3 architecture. While traditional overclocking involved setting a particular clock multiplier and voltage number in the BIOS, the curve optimizer overclocking does not produce a fixed clock speed like the traditional method. Instead, it uses the Precision Boost Overdrive 2.0 technology to simultaneously undervolt and overclock your CPU. This process is similar to the process of tuning Ryzen 3000 CPUs using CTR. In order to achieve an actual overclock on your Ryzen 5000 series CPU, there are three major components that need to be understood and optimized – PBO 2.0, Power Settings, and Curve Optimizer itself.
PBO 2.0
PBO or Precision Boost Overdrive is a setting by which you can extend the normal parameters that dictate the performance of a Ryzen CPU. With PBO you are basically allowing the boosting behavior of the CPU to become more aggressive. PBO takes into account the various parameters such as temperature, power draw, and VRM current to smartly adjust the boosting behavior of the CPU. PBO also simultaneously increases the threshold for these parameters, thus allowing faster clock speeds to be achieved for longer. PBO 2.0 is essentially an auto-overclocking system that is built right into your CPU.
Power Settings
The power settings of the CPUs are divided into three main components – the PPT, TDC, and EDC. PPT is essentially the total power that the CPU can intake. TDC is the amount of amperage that the CPU is fed under a sustained load, and it is thermally and electrically limited. EDC is the amount of amperage the CPU is fed under short bursts which is electrically limited. In order for the curve optimizer to improve the CPU’s performance, the CPU should be allowed to take more power overall, and that allows the CPU to boost more aggressively and for longer. More power does increase heat output, however, so that is something that needs to be dealt with via cooling solutions.
Curve Optimizer
The curve optimizer is a tool that allows you to undervolt your CPU. Undervolting is the process by which you reduce the amount of voltage being provided to the core, and that reduces the heat output and the power draw of the CPU. In order to get the best results, undervolting should be combined with Precision Boost Overdrive 2 which simultaneously allows the CPU to boost higher while consuming less voltage. This can be done by the use of the curve optimizer.
Method
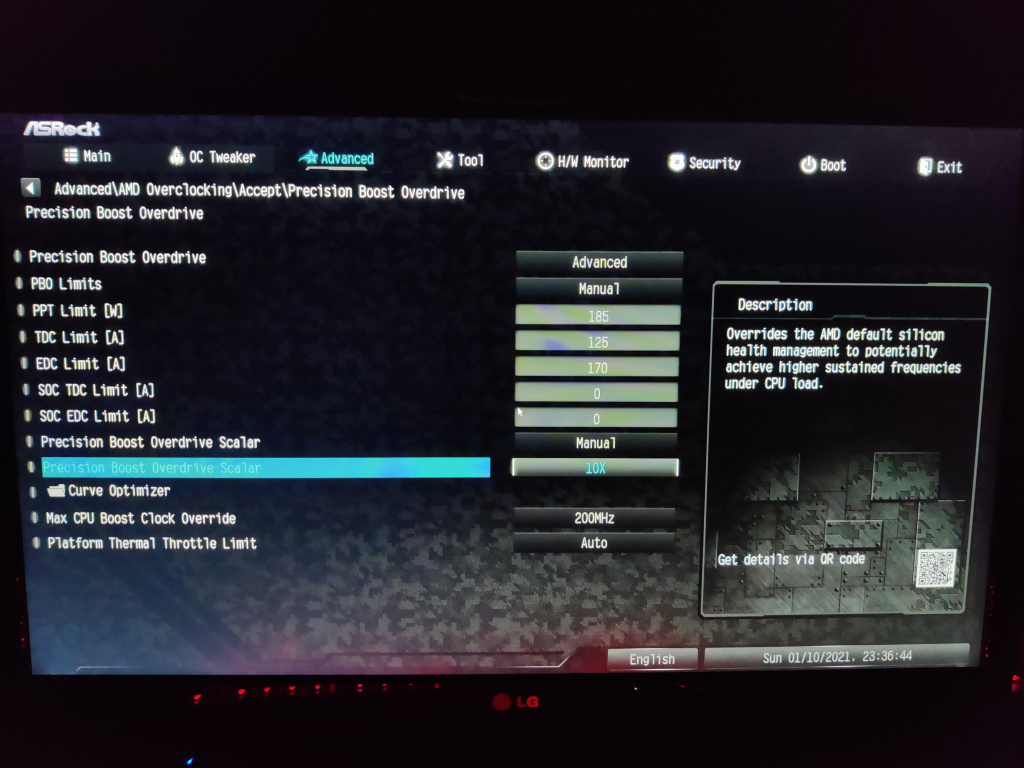
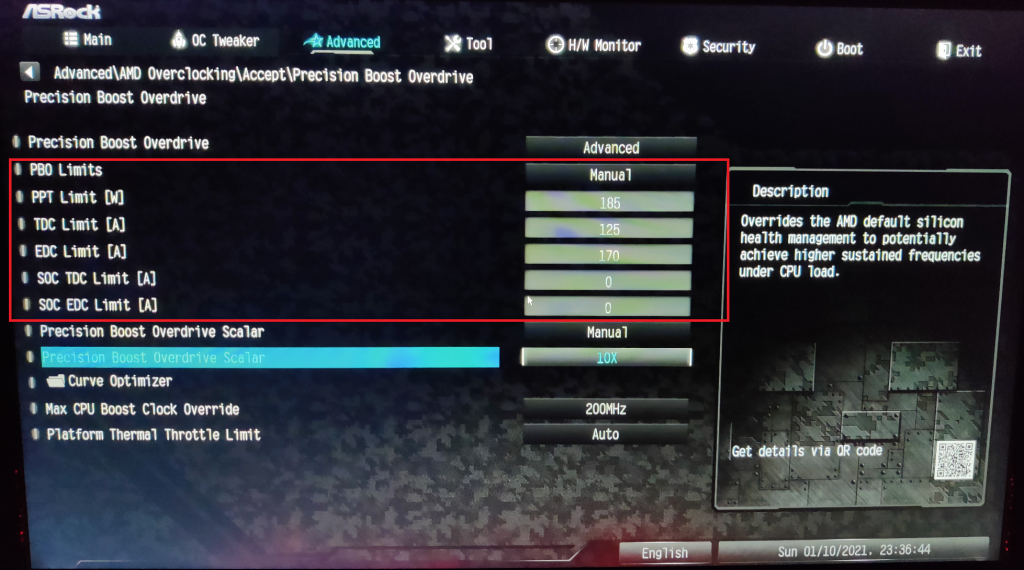
The process starts by simply accessing the BIOS of your motherboard which is where the settings for PBO are found. Different motherboards have their settings in different locations so your mileage may vary. Mostly these can be found in Advanced – AMD Overclocking – Precision Boost Overdrive. First, you need to set your priorities for overclocking. It is recommended that the following priority order be followed for a modest yet stable overclock. Some enthusiasts differ and believe the following to be the best priority order. It is important to note that both of them will provide a noticeable performance gain and the differences are negligible in day-to-day use. First, we need to tackle the Precision Boost Overdrive 2 settings.
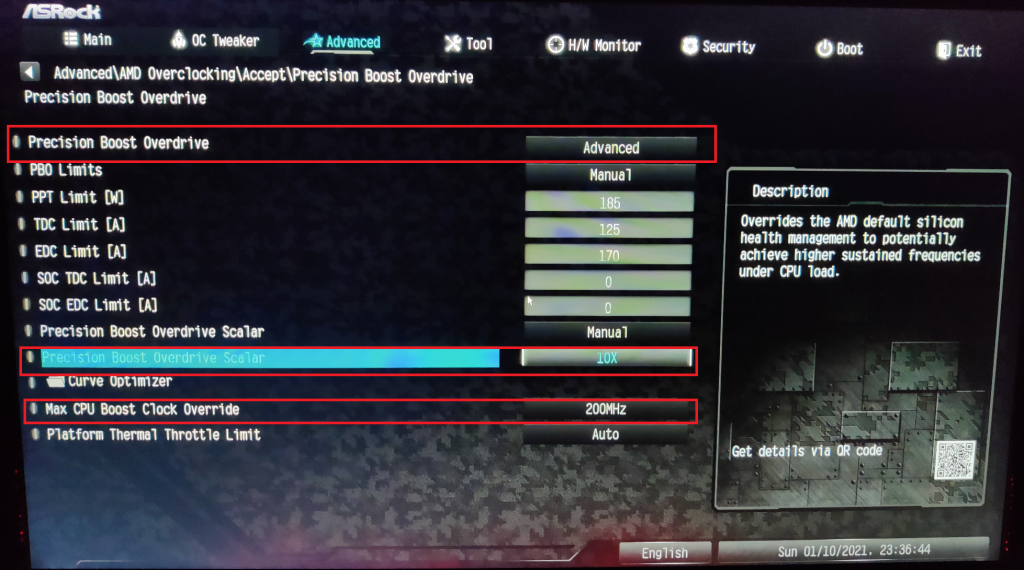
Precision Boost Overdrive – AdvancedPBO Scalar – 10XMax CPU Boost Clock Override – 200 MHz
These settings enable the PBO algorithm and set it to a fairly aggressive setting. The 10X PBO scalar should allow us to sustain boost clocks for longer, while the max boost clock override will increase the maximum CPU frequency by 200 MHz. On a Ryzen 9 5900X, this translates to a theoretical limit of 5150 MHz, but this value will be different for different CPUs in the Ryzen 5000 lineup. Secondly, we need to alter the power settings. The following settings are for a Ryzen 9 5900X, and should be lowered accordingly for the Ryzen 7 5800X and the Ryzen 5 5600X. The Ryzen 9 5950X might even benefit from an increase in these values.
If your cooling is relatively powerful (such as a custom loop or strong cooling in general) PPT – 185W TDC – 125A EDC – 170AIf your temperatures get uncomfortably high with the settings above, try a more conservative setting. PPT – 165W TDC – 120A EDC – 150A
Users with Ryzen 7s and Ryzen 5s might even want to lower the settings more in order to get stable temperatures and clock speeds. Trial and error is involved here. User should also leave SOC TDC and SOC EDC to 0, as these values do not impact these CPUs. If you want to revert your settings back to the defaults in the future or make other adjustments, these are AMD’s default values for the Ryzen 5000 series.
Package Power Tracking (PPT): 142W 5950x, 5900x and 5800x and 88W for 5600x.Thermal Design Current (TDC): 95A 5950x, 5900x and 5800x and 60A for 5600x.Electrical Design Current (EDC): 140A 5950x, 5900x and 5800x and 90A for 5600x.
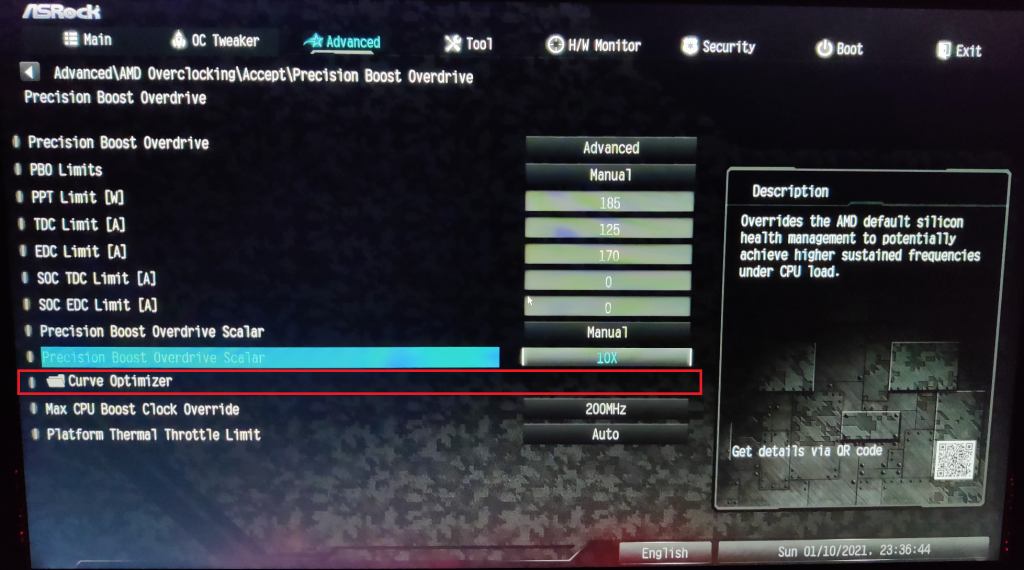
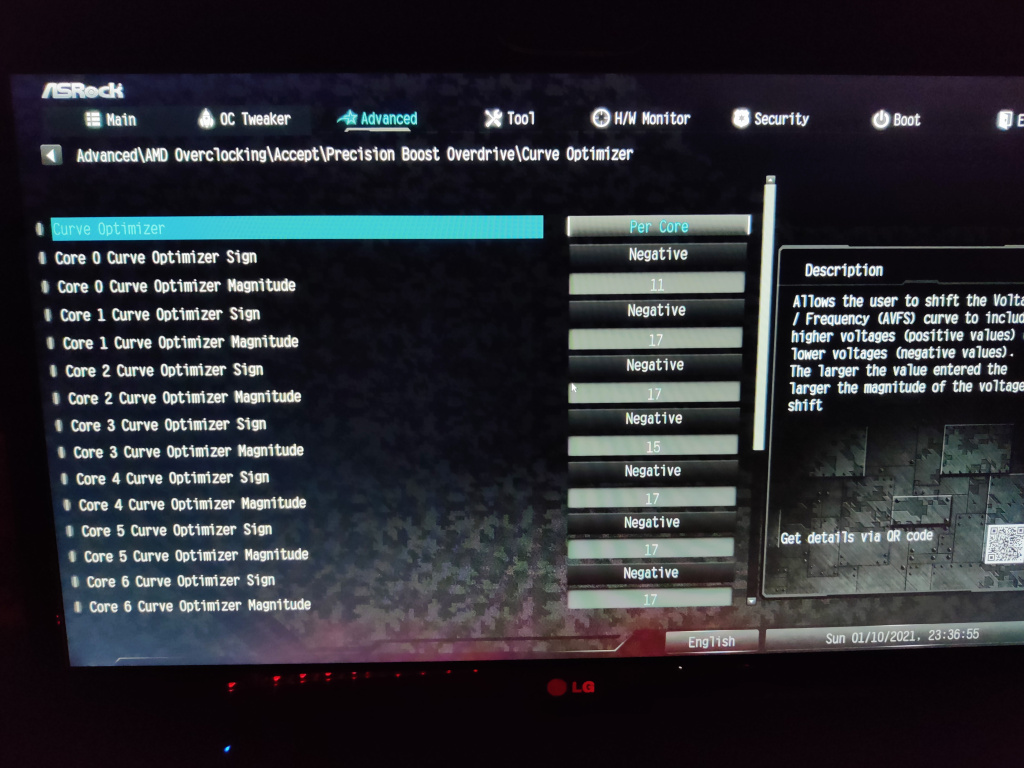
Thirdly, we need to adjust the curve optimizer settings. These are the ones that would require the most trial and error and might also be quite annoying. The main problem with this overclock is that the numbers you input here will vary wildly between one chip and another, so one overclock that works for one CPU might be completely unstable for another. This is the part that requires the most testing and the most patience. For the 5900X, the following values were found to be optimal.
Negative 11 for the first preferred cores on CCX 0 (as indicated by Ryzen Master)Negative 15 for the second preferred core on CCX 0 (as indicated by Ryzen Master)Negative 17 for the other cores.
For starters, negative 10 can be applied as an offset for all cores, and then you can optimize different cores as you go along. It should also be kept in mind that “entering 10” means an offset of 30-50mv in either direction as each “count” is equal to + or – 3 to 5mV. It is quite a complicated overclocking procedure but at the end of the day, this is the best method to overclock a Ryzen 5000 series CPU. As with any CPU overclock, testing is extremely crucial and requires a lot of patience. Since we are dealing with automatic voltage adjustments while undervolting, the CPU might crash under idle conditions a lot due to aggressive undervolting while idle. On the contrary, stress testing might show that your CPU is completely stable. It is definitely an overclocking procedure that requires a lot of patience and a lot of attention, as you cannot just leave AIDA64 running throughout the night while you are asleep.
Undervolting vs. Overclocking
The relationship between the stability of your undervolt and your auto-overclock settings is quite crucial. Essentially, the more aggressively you undervolt, the higher your gains, but simultaneously the higher you set your AutoOC offset, the less stable your undervolt becomes. Curve optimizer overclocking is a fine balancing act between overclocking and undervolting using the chip’s built-in auto-overclocking mechanisms.
Conclusion
AMD CPUs have never been known to be the overclocking champions as they often had limited overclocking headroom and had lower boost clocks than Intel CPUs in general. However, with the Ryzen 5000 series of CPUs based on the Zen 3 architecture that might just be changing. Curve Optimizer overclocking is the process by which a user can take advantage of the Precision Boost Overdrive 2.0 auto-overclocking feature and combine it with the undervolting capabilities of the curve optimizer. The method is a bit more complicated than traditional overclocking, but the results are quite positive, to say the least. With this method of overclocking, users are actually primarily undervolting the CPU but also providing the PBO algorithm with an AutoOC target. PBO 2.0 thus has to overclock the CPU using the lowered voltage that is dictated by the curve optimizer and therefore provides results that combine the best of both worlds. While traditional overclocking increases the clock speeds by increasing the voltage, this form of overclocking allows the CPU to boost more aggressively while lowering the overall voltage provided to the core. The stability testing is a bit more complicated, however, the results make it all worthwhile.
SOLVED: Unfortunately Connections Optimizer has StoppedHow to Change and Improve the Fan Curve of your Over-Heating GPU: The Safe and…Next-Gen AMD Ryzen 4000 ZEN 3 Series To Pack 10 Cores With Per-Core…AMD Zen 3 Architectural Improvements: Explained
