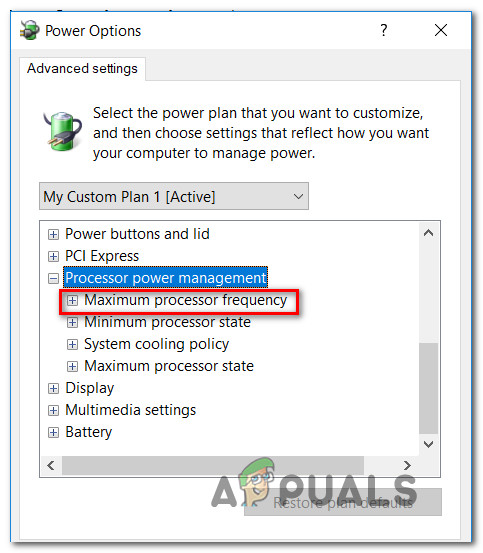
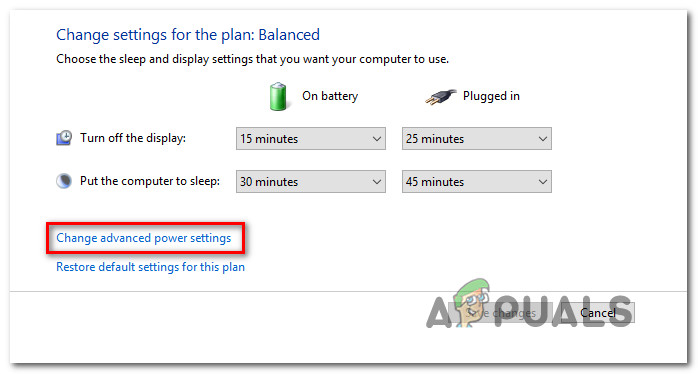
However, there are reasons why you’d want to limit the frequency on Windows 10. Maybe you want to save energy or maybe you just found out that your CPU is running too hot when it’s tasked for demanding tasks. Fortunately, Windows 10 includes a way to program the maximum processor frequency, but the option is hidden by default.
What is the Maximum Processor Frequency?
The frequency of a processor specifies the operating frequency of the CPU core(s) – It is measured in MHz. Generally, the higher the frequency, the faster the processor will be. If you know how to do this, there are ways that will help you specify the approximate maximum frequency (in MHz) of your processor from within Windows 10. You will be allowed to predetermine the maximum processor frequency in two different scenarios:
On Battery – When the computer is running on the batteryPlugged in – When the computer is plugged into a power source
Keep in mind that most modern processors manage themselves and there are few advantages to be gained by changing processor-related settings from the Windows menu. It might actually end up affecting your PC performance by limiting the maximum frequency allowed. However, manipulating the maximum processor frequency is effective in those cases where the user notices that the processor runs too hot on the default maximum frequency and wants to take precautionary steps against hardware malfunction. This procedure is also effective if you’re working with a limited laptop battery and you’re looking to increase your screen time. Limiting the maximum frequency might end up giving you some extra minutes before you need to plug your laptop into a power source.
How to Add the Maximum Processor Frequency option?
Starting with Windows 10 built 1709, the power supply option “Maximum Processor Frequency” was removed from the Power Option tab. So if you have an up-to-date version of Windows 10, you can no longer adjust the Maximum Processor Frequency, because the option is now hidden by default. If you’re looking for ways to manually program your maximum processor frequency, this article will show you several ways to do it directly from the Windows 10 interface – no 3rd party software needed. But keep in mind that the max MHz that you can specify will be the highest frequency allowed for the CPU. With this in mind, note that you can’t use this option to overclock your CPU frequency. You can only underclock the CPU frequency, given that the maximum value is the highest allowed by your CP. In the methods that follow, you’ll learn of two different ways that will allow you to either Add or Remove the Maximum Processor Frequency menu inside Power Options.
Method 1: Adding or Removing the Maximum Processor Frequency menu using Command Prompt
If you don’t mind working from a terminal, then the quickest way that will allow you to add the Maximum Processor Frequency is from an elevated Command Prompt window. We’ve tested this method ourselves and we can confirm that it works as intended. But you’ll need to have an up-to-date copy of Windows 10 in order for this to work. Here’s what you need to do: Note: If you ever want to make the Maximum processor frequency menu to go away, follow Step 1 again but this time, use the following command to remove the menu from Power Options: If you’re looking for a different approach in making the Maximum Processor Frequency menu appear inside Power Options, follow the methods below.
Method 2: Adding or Removing the Maximum Processor Frequency menu via Registry Editor
Another way to go around making the Maximum Processor Frequency menu visible inside the Power Options window is to use the Registry Editor. You just need to change the value of one registry key. The whole process is extremely simple (the hard part is getting to the correct location). Here’s a quick guide on adding or removing the maximum processor frequency menu via Registry Editor: Note: If you ever want to make the Maximum Processor Frequency option invisible again (via Registry Editor), simply return to the same location ( HKEY_LOCAL_MACHINE\SYSTEM\CurrentControlSet\Control\Power\PowerSettings\54533251-82be-4824-96c1-47b60b740d00\75b0ae3f-bce0-45a7-8c89-c9611c25e100) and set the Attributes value to 1.
How to change the Maximum Processor Frequency on Windows 10
Now that you’ve used one of the methods below to make the Maximum Processor Frequency option visible inside the Power settings window, it’s time you learn how to change the settings. Just in case you’re not a fan of the GUI approach, we also included a method that will allow you to adjust the maximum processor frequency via Command Prompt.
Method 1: Changing the Maximum Processor Frequency via the Power Options menu
If you want to stay away from the CMD terminal and do all the modifications from a visual menu, this option is from you. Using the steps below, you will be able to change the Maximum Processor Frequency directly from the Power Options menu. Here’s what you need to do: If you’re looking for a more technical approach that will save you some time, follow Method 2 below.
Method 2: Changing Maximum Processor Frequency via Command Prompt
If you consider yourself a technical person, then this approach might suit you better. Follow the steps below for instructions on how to modify the maximum processor frequencies straight from an elevated Command Prompt. You will be able to modify both values (On Battery and Plugged In) as you can from the GUI menu. Here’s a quick guide on changing the Maximum Processor Frequency via Command Prompt:
AMD R9 7950X To Reach ‘F-max’ Frequency Of 5.85GHz, Higher Than Raptor Lake’s…How to Configure Minimum and Maximum PIN Length in Windows 10The RTX 4090 Has Been Overclocked to 3.24GHz With 20% Higher Memory Frequency…How to Increase Maximum Volume on Mediatek-Based Android Devices through…


